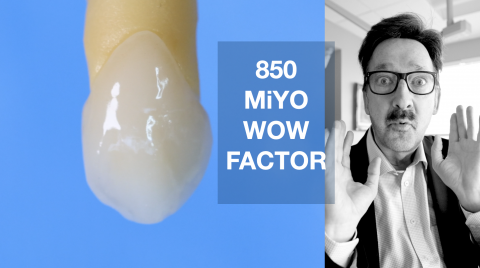
MiYO 850 Anterior Crown Workflow on a Pre-Crystalized e.max ceramic.
Today, I would like to share some insights into optimizing the use of e.max, particularly in anterior restorations. My goal is to become more efficient—especially when working in a clinical setting—so I can deliver high-quality results quickly without sacrificing artistry.
Efficiency in my workflow is vital. When dealing with anterior restorations like veneers and crowns, I want to "fire" or complete my restorations in as few steps as possible. This is crucial in a clinical environment where turnaround time impacts patient satisfaction and clinic productivity. I aim to streamline my process so I can focus more on the artistic aspects, such as shaping, texturing, and glazing my ceramic restorations.
Specifically, I love working with HT e.max ceramics because of their translucent qualities and natural appearance. In my practice, I often pre-shape and texture the pre-crystallized before glazing, allowing me to fine-tune the aesthetics before firing. One particular glaze I favor is Mio 850, because it gives the e.max a very natural finish. Its brush-on application resembles an enamel-like surface, making it ideal for creating that incisal edge definition and blending seamlessly with adjacent teeth.
When working with anterior restorations, especially veneers or crowns, I tend to use more translucent e.max, particularly if I don’t need to block out a dark root. The translucency allows the restoration to mimic natural teeth more convincingly. When I use HT (high translucency) e.max, multiple firings can sometimes lower the overall value of the restoration, which could be a concern if it’s a highly visible anterior case.
To counter this, I utilize MiYO 850 ceramic layering and a single firing protocol to maintain the desired brightness and translucency. I recently worked on a case where I used a single firing of MiYO 850 on an HT shade, achieving a beautiful blend that matched well with her other teeth. Creating subtle incisal effects, such as the incisal edge, involves techniques like working with Smoke, Storm, and Halo Spring shades for contrast, which enhances the natural look by mimicking the translucency and depth of real enamel.
My workflow involves careful texture, staining, glazing, and firing protocols. When applying glaze, I like to add about 10-15% more texture than I ultimately want, knowing that the Mio 850 glaze will smooth and neutralize it after firing. I use specific brushes—Size 3 for applying glaze and working with the consistency to achieve a homogeneous surface.
Coloring techniques include applying low-value shades, such as Smoke, along the incisal edge, extending into line angles, and using Storm shade for added translucency and contrast. I also employ the Lumen or Halo Spring to subtly highlight the incisal edge, working with fine brush strokes to enhance the natural appearance while keeping everything thin and delicate.
Finally, firing is performed in my CS2 or CS6 furnace using the speed crystallization cycle, which produces precise and predictable results. This approach allows me to complete anterior veneer cases in a single appointment, saving time while maintaining artistic quality. I design most restorations digitally using Primescan and Primemill, which helps streamline the process from design to final firing.
Thanks for watching! If you have questions or comments, please leave them below.